DAY 1 – PLAYING WITH INK AND EMBOSSING POWDER!
Years ago I saw a card on the internet that was the inspiration for this card.
I honestly don’t know who de card made because in those days I saved things I liked on my computer, I don’t think Pinterest existed then. And there was no name on it.
I needed a birthday card for a friend and I know she loves getting handmade cards, she makes cards as well but she never with ink. That’s why I decided to make this card.
For the background I used watercolour paper and three colours of Distress ink.
I taped my watercolour paper on to a board to minimize warping because I used quite a bit of water.
First I added water to my panel with a wide paintbrush, so the panel was lightly wet. Then I put my inks on to my craft sheet and diluted them with a mix of water and Perfect Pearls. Unfortunately you don’t see the beautiful soft shimmer of the Perfect Pearls on the photo.
With a paintbrush I made my background by starting with the darkest colour on the bottom left side and ending with the lightest colour on the top right side. Taking care that all blends nicely, I worked wet in wet so that there would be no hard lines between colours.
When the panel was finished I put it aside to dry.
In the meanwhile I stamped on a piece of copy paper the lay out I wanted with my stamp.
It’s a smaller stamp and I needed to know where I wanted to stamp and where it would be overlapping so I could use a piece of paper or wipe of the ink on the stamp to prevent stamping on top of each other.
When the panel was dry I put it in my TH stamping tool. The copy paper, that was the same size as the panel, I put on top of the panel and adhered it with a piece of purple tape only on the top so that I made a hinge. This way I could place my stamp on the exact place on the copy paper, close my door of the stamping tool, open the door, picking up my stamp and fold the copy paper upwards.
I stamped with VersaMark, put my embossing powder over it and heat embossed the first flower branch.
Then I lay my panel back in my stamping tool, fold the copy paper again over it and place my stamp again on the paper, close the stamping tool picking up my stamp and fold the copy paper upwards. Stamped and embossed the second flower branch.
I repeated the process of stamping and embossing until my lay out was finished.
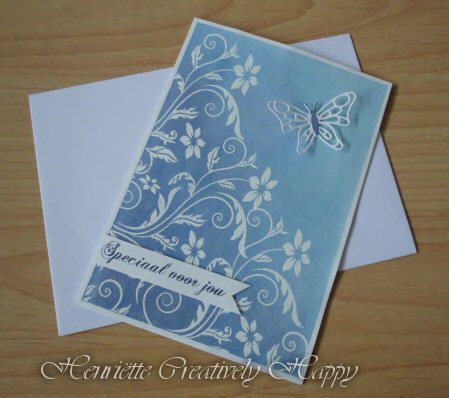
I die cut the butterfly and coloured the body of the butterfly with Chipped Sapphire.
I also used this colour to stamp my sentiment, it says “Especially for you” in Dutch.
After the ink was dry I cut it with my scissors in to a strip with a fishtail.
I adhered the panel with double sided adhesive to a folded base card.
Both the butterfly as the sentiment strip I adhered on to the panel with 1 mm. foam tape for some dimension.
And that finished the card I enjoy making this very much.
The used materials are under the image and if you have any questions don’t hesitate to ask.
Used Materials
WaterArt watercolour paper
Distress Ink Tumbled Glass – Broken China – Chipped Sapphire
Ranger Perfect Pearls – Pearl
Joy Crafts 6410-0091 Silhouette Flowers Love Stamp set
Tim Holtz Stamping Tool
Studio Light Sentiment stamp
Elizabeth Craft Design. 713 Small Butterfly Die
Vagabond

Beautiful!
LikeLike
Thank you so much John, that hearing from you makes me so happy!
LikeLike